How awesome would it be to just jump in the car, drive for a few hours then set up camp for the weekend?
How much more awesome would it be if you didn't have to pack everything, because it was already in the car? And how much MORE awesome would it be that if it did rain you wouldn't get too wet like you would in a tent?
So I know you know how excited I am to be getting a campervan.
I can just picture us cruising down the highway with our tunes blaring to some 80's hit, hair down, curtains swaying in the back, on our way to a destination unknown, what bliss!
It's not fancy, new, rust-free or probably leak-proof, but it's mine! YAY
We'll be picking it up in a few days then starting to put our own stamp on it with a new colour, a good clean and then decking out the interior. I will be positng photos of the transformation.
Now I should start thinking about some decorating for the inside, maybe some curtain and pillow sewing. I'd love to put photos and pictures up on the inside too. Your ideas are most welcome!
Stay tuned!
:)
Friday, November 26, 2010
Thursday, November 25, 2010
Sewing school - class 1
I had my first lesson at my beginners sewing course on Monday.
We started right at the very beginning with threading the machine, filling and inserting the bobbin, selecting the correct needle size and type and removing and inserting the needle. Pretty basic, and I did know most of it.
Although I did learn that you shouldn't just use the needle that came with the sewing machine for everything! Ha
So now I am a little more aware of the different types of needs for different fabric types and also how often you should change your needle (every 4-8 hours of sewing apparently, certainly haven't been doing that in the past!). I also learnt that those little metal things in sewing kits are actually needle threaders, will come in handy when my eyesight starts to fail me!
I'm looking forward to expanding my skills a little with the next 3 lessons, particularly inserting buttons and zippers. But I am enjoying being able to ask a professional questions and getting to know the little quirks of my particular (old) machine.
I would recommend beginner sewing classes to those just starting out. Even though they may go over things you already know, you never know what little tidbits of information you will pick up from the teacher or others in your class, and also better ways of doing those things you've done a hundred times before.
Happy sewing!
Friday, November 19, 2010
Perfect day

What makes a perfect day?
A secluded picnic with my boy, on the waters edge, with wine, cheese, wraps and laying back looking up at the clouds together, that comes pretty close I think.
Whats your idea of a perfect day?
{this moment}
{this moment} - A Friday ritual. A single photo - no words - capturing a moment from the week. A simple, special, extraordinary moment. A moment I want to pause, savor and remember.
Inspired by soulemama
Have a fabulous weekend!
Inspired by soulemama
Have a fabulous weekend!
 |
| Carrot Harvest! |
Thursday, November 18, 2010
Sewn gifts
I am very slowly increasing my sewing confidence and skills, through a lot of unpicking, swearing, re-cutting and going without patterns.
This past week I have started working my way through my gift sewing list.
First up was a simple pincushion - a gift for myself

I used the throw blanket I picked up from my op shopping adventures the week prior and used my new rotary cutter and mat to create this simple but cute pincushion. The stuffing was even recycled! From Reverse Garbage for $2 a bag for cleaned raw sheeps wool, bargain! I didn't use a pattern just a few pictures I found online for the design.
I'm pretty happy with it. But I do still need to work on the stitches I used for closing the pin cushion. I think they stand out too much (right corner in picture above). What method do you use to close seams after stuffing?
My next gift was for a dear friend who's birthday is this weekend. Since I will be visiting my grandparents 4 hours away I won't see her on her birthday, so we are having lunch together tomorrow and I will be giving her this garden apron. She is a keen gardener and we always share our gardening stories with each other. I think she'll love it!
I used the tutorial from Make-it-do for this apron, and yep you guessed it, the same material as the pin cushion, from the thrifted blanket.

This was my first try at using bias binding. I have since decided I will never use any bias binding less than 25mm! Ha ha. You can see the bias on the top of the pocket is qute a bit thinner than the tape around the bottom of the apron, I vowed I needed a bigger width after using the 12mm tape and had so much trouble keeping the fiddly stuff in place!I raced out to get some from Spotlight straught away so I could finish off the apron.
I have since bought 3 different sized bias tape makers from eBay for $15 so I can make it myself from whatever material I like.
My next project was a patchwork-type pillow for my Nana. When my sisters and I were younger we used to spend Christmas holidays with my Nan and Pop on their hobby farm in Wagga Wagga NSW. One christmas I remember quite vividly was my Nana teaching the three of us (aged 5, 7 and 10) to make our own patchwork pillow cover. So I thought it would be nice to give one as a gift all these years later.

A simple project made even easier with my rotary cutter and mat, I love those things!
This was my first project inserting a zipper. I found it surprisingly easy by just winging it and working it out for myself, rather than using instructions in one of my sewing books. I certainly learn better by doing than reading I have discovered!
I am yet to make the little pillow to go inside this cover, well that's a lie I did make one and it was too small and looks silly in the cover so I am going to make another one that will be bigger to fill it out more. I will keep the first one and make a cover for it and maybe give it as a gift to someone else.
Ah trial and error, it'll all works out in the end.
And how satisfying is it to create a gift for someone from scratch, to know I am increasing my homesteading skills and to not spend much money in the process! How very frugal!
xx
Kim
Wednesday, November 17, 2010
Sewing bliss!

Ah what bliss to sit at my sewing machine, wine in hand and look out across the leafy backyard.
This is life!
:)
Kim
Tuesday, November 16, 2010
Busy, busy, busy
I have been so busy productive this last week, it feels fabulous! You've probably noticed from all my posts! I know Hazel has :)
I have now been on my 'home holiday' for 2 weeks now.
In the first week it was a very different story, I barely got anything done.
You see I'm a list person. And when I started these holidays, I thought relaxing menat doing without my lists, becuase they mean work don't they, things to do. So I had all these great ideas for the things I'd like to enjoy, learn and make on my holidays, but because there were so many things I was like a deer in spotlights! I had no idea where to start and I was quite overwhelmed.
So out came the lists again.
I have a list for the christmas presents I'd like to make
I have a list for what odd-jobs need doing around the house
I have a list for what personal things I need to do, e.g. dr appt, dentist, optometrist, etc (those things you put off when you're working!)
I have a list for what things I'd like to cook/bake
I have a list for what blog posts I will write about
I have a list for day trips/places I'd like to visit
I have a list of things I want to Freecycle/declutter
That looks a little daunting doesn't it? Well there isn't a whole lot on each list and I absolutely love that feeling of crossing each line of lists. Yes I'm a little weird! This is what I am enjoying doing on my holiday, when I could be doing ANYTHING! Well that's how I work and it took me about of fluffing about to work that out.
Now that I have these lists I am on average half way through them all - see how productive I am with my lists!
Now don't worry I'm not overdoing it and not enjoying my time off. I'm just not a person that can sit around all day. I love doing things, especially things I enjoy - gardening, sewing, baking, visiting.
So now I'm off to check on the scones in the oven, see if my berries have defrosted for some jam making for gifts, quickly sew up a pillow insert for a pillow cover I made for my grandparents who I'm driving 4 hours to visit on Friday, create a tag for another gift for a friend I'm meeting for lunch tomorrow and check out campers for sale on line, all before going out for dinner tonight with some people I've worked with in my short term job these past 2 weeks.
I'm so happy!
Sunday, November 14, 2010
Sewing classes here I come!
My lack of understanding of sewing patterns and terminology coupled with my very eager enthusiasm has me in quite a situation. I would love to sew up some unique and personal gifts for my family and friends this christmas and also start sewing clothes for myself and hubby, but at the moment just don't have the skill set.
So I have enrolled in sewing school!
Sewing Intuition are located about a 10 minute drive from my house and have classes that a) really suit my (lack of) skill level, and b) are quite affordable (yep I'm always on the lookout for frugal options!).
The course goes for four weeks with one 2 hour lesson each week and focuses on:
I do already know how to do a few of these things but I think it would be really worthwhile to have someone show me the correct way in case I am doing those things I think I can do, incorrectly.
I'm very excited to head along to my first lesson next Monday. I will let you know how I go.
Eek! Excited!
So I have enrolled in sewing school!
Sewing Intuition are located about a 10 minute drive from my house and have classes that a) really suit my (lack of) skill level, and b) are quite affordable (yep I'm always on the lookout for frugal options!).
The course goes for four weeks with one 2 hour lesson each week and focuses on:
- Threading the machine
- Fill and inserting the bobbin
- Select the correct needle size and type for your project
- Remove and insert the needle
- Select the correct thread tension for your project
- Select the correct stitch length for your project
- Use different machine stitches
- Sew a buttonhole
- Sew a zipper
- Take up a skirt hem, pant hem and jeans hem
I do already know how to do a few of these things but I think it would be really worthwhile to have someone show me the correct way in case I am doing those things I think I can do, incorrectly.
I'm very excited to head along to my first lesson next Monday. I will let you know how I go.
Eek! Excited!
Saturday, November 13, 2010
Op Shopping
Oh how I love op shopping. All those little treasures that must have many stories to tell, if only every item came with a little note about its journey.
I no longer buy new clothes from departments stores, yet instead opt to recycle and upcycle clothes that I find at thrift stores. Sometimes it's a struggle to find what you're after but when you do, it's like christmas all over again, and usually at a bargain price.
If people want to throw out their clothes and other goodies to replace with new stuff, I will certainly put them to good use. I'm not too proud to wear second-hand clothes. Responsible shopping I like to call it.
Check out my latest finds!

A beautiful dainty little dress. Now lets hope my sisters baby is a girl!

And what does that little card say? "Antique dress as is 20c"
Yep that's right I only paid 20cents for this little beauty! (I'm not sure if it is acutally antique or just old!)

A beautifully-patterned day bed throw for $5, but I'm more inclined to cut up the material and use it for my sewing projects. I think this would be a beautiful material to use for my sisters nappy bag, not too gender-specific which is good because they won't know what they're having til the little thing pops out!
If you haven't already, I encourage you to head down to your local op/thrift shop and see what little treasures they might have waiting for you!
How so very frugal!
Cheers
Kim
Friday, November 12, 2010
Made my own laundry liquid!
Prompted by my desire to eliminate as many chemicals as I can from our house, I have started looking into green cleaners.
Rhonda at Down to Earth has some fabulous posts (aren't they all!) that make it look so easy! Check them out here and here.
So yesterday I was like a witch standing over my cauldron stirring my green and clean concoctions!
All I used was:
1 bar soap, grated
1/2 cup washing soda (powder, not crystals)
1/2 cup borax

Put it all into a saucepan. Then add about 1 litre of water

And keep on the heat until all of the ingrediants have dissolved.

I then did the same as Rhonda, and took the mix downstairs to the laundry.
Add about 8 litres of hot water to a bucket, then add the mix froom the saucepan.

Stir well, and leave to cool down.
Once cooled, pour into containers for storage (I used a funnel, was much less messy!), then remember to label so you remember what's in the bottles!

Give a good shake just before using and use 1/4 cup in with your washing.
How simple is that! Took me about 30 minutes in total and now I have 10 litres of laundry liquid.
The cost savings are quite significant too, see Rhonda's posts linked above for the details.
Let me know if you have a go at making your own laundry liquid or other cleaners, I'd love to hear what's the best recipes you've found.
:)
Kim
Pledge update
The beginning of the current financial year prompted me to sit down and write some goals that I could work towards on my journey to living simply and more responsibly. I was spurred on by Sam, who's blogging at All Things Quilty, decision to do the same.
I think an update is certainly due, to keep my accountable
Listed are the pledges I made, with my progress in purple.
Some other steps I'd like to begin also, include:
:) Kim
I think an update is certainly due, to keep my accountable
Listed are the pledges I made, with my progress in purple.
- Not purchase any new clothes. I have bought 1 t-shirt for $10 I do admit, but everything else has been from op-shops, thrifted or made myself. Eventually I want to start sewing a lot of my own clothes but at the moment I am at the point where I am very slowly increasing my skills and confidence with my sewing machine.
- Make my own bread well enough to stop buying store-bought bread and make my own yeast starter. Well I can very happily say that I have not bought a loaf of bread from the store in months. I am still using bread mix and haven't progressed to making my own flour mix yet, but I'm pretty happy with where I'm at. It is quite a bit more time consuming mixing, kneading, resting, kneading again and then cooking the bread but it is much cheaper ($2.80 per loaf shop-bought compared to $12 for a mix that I get 14 loaves out of - equates to less a dollar a loaf!). On that note I haven't started investigating making my own bread started yet.
- Keep all of my plants alive and make organic fertiliser and pesticide. I am doing very well at keeping my plants alive at the moment, and can't actually think of any plants that have died, YIPPEE! Although my rhubarb is looking a little distressed at the moment so I don't want to jinx myself. My trouble is with seed raising, I just don't have that mastered yet. I think I will have to re-read all of my books on seed raising and really focus on just a few types at a time before I become more proficient at this. I have been using chicken poop from my mum's chicken coop for my fertiliser and luckily haven't required any pesticides yet.
- Make my own dishcloths. Simply answer, no. Crocheting and knitting have fallen by the wayside with this hot summer-like weather we've been having recently. Although I really need to suck it up and get back into crocheting to finish off a blanket for my sisters baby due in January. We are also very close to needing new dischoths so nothing like a bit of extra motivation!
- Make my own dishashing liquid. No, but I have made my own laundry liquid. See next post.
- Stick to my new budget and save $7200 by December. Tick, I have already saved that much. Although now that I am 'on holiday from work' (ie. unemployed but not actively seeking work just yet) I will get through bit of my savings, but should remain above the $7200 in savings.
Some other steps I'd like to begin also, include:
- Setting up a chicken coop and getting a couple of laying hens
- Make at least 75% of all of my christmas gifts
- Harvest lots of vegies, and stop having to buy lettuce and tomatoes at least.
:) Kim
Thursday, November 11, 2010
Using up a glut of fruit and vegies
I have barely left the kitchen today!
We have ended up with a glut of carrots, potatoes, pumpkin, oranges and a range of other fruit and vegies that we need to use up VERY soon.

So far I have made:
We have also been cooking up soups and roast vegies to get through it all.
This is what happens when you go to the country and come aross a quaint little farm stall! Be warned! hehe
:)
Kim
We have ended up with a glut of carrots, potatoes, pumpkin, oranges and a range of other fruit and vegies that we need to use up VERY soon.

So far I have made:
- orange and lemon cordial (3 jars full) - I use my own recipe - juice your fruit, put in saucepan and add sugar to taste, warm until sugar has dissolved then bottle, easy peasy
- pumpkin loaf
- Lady Flo's pumpkin scones
- another loaf of bread
- roast pumpkin slices, for salads and sandwiches
- carrot cake as a loaf
We have also been cooking up soups and roast vegies to get through it all.
This is what happens when you go to the country and come aross a quaint little farm stall! Be warned! hehe
:)
Kim
Wednesday, November 10, 2010
Christmas cherry ripe biscuits
You have got to pop over to Cityhippyfarmgirl's blog right now and check out her recipe for Chocolate cherry biscuits! Here is the link, don't waste any time go now!
Don't they just look and sound absolutely divine!
I have renamed mine Christmas cherry ripe biscuits, and I think they would go perfectly in my christmas gift hampers I am creating full of home-made goodness for this years presents.
But before any of that, I must taste test them of course. Mine are just about to come out of the oven......
;)
Pumpkin Pie!
Recently we have had an excess of vegies that we have been trying to use up before they go bad.
Using an altered recipe from an op-shop plate that I picked up, we made Pumpkin Pie. It turned out fabulous! I can't believe I've never had pumpkin pie before. I guess it is more an American thing but I'm certainly a convert now!

Couldn't even get a shot of it before being eaten!

I think it was the condensed milk in the recipe tht makes it taste so damn good!
I'm off too make another one now, because we finished the first one quick smart. Lucky we did too because the recipe is on the plate so now I can give it to you so you can try out this delicious pie yourself
"Op Shop Plate Pumpkin Pie"
Combine 1.5 cups steamed & cubed pumpkin with 3/4 cup sugar and 2 slightly beaten eggs.
Add quarter teaspoon of salt, 1 teaspoon of cinnamon, half teaspoon of ginger, and a quarter teaspoon of nutmeg.
Add two-thirds cup condensed milk (yummy!) and three-quarters cup water, mix thoroughly.
Pour into uncooked pastry shell (made yourself or shop bought if you're short on time).
Bake in 220 degrees celsuius oven for 15 minutes then reduce heat to 170 degrees celsius and bake for 4 minutes more
Enjoy!
xx
Kim
Saturday, November 6, 2010
Starting to think about Christmas gifts
I try to stay away from the shopping centres as much as possible, but grocery shopping once every fortnight/3 weeks means I am witness to the onslaught of plastic christmas-themed stuff popping up already.
At least it gets me thinking early about what I can sew, bake and make for this years frugal and meaningful gifts.
At the moment I am thinking a hamper type thing as a gift for my family with:
I'd love to hear if you make you gifts and what you create.
x
Kim
At least it gets me thinking early about what I can sew, bake and make for this years frugal and meaningful gifts.
At the moment I am thinking a hamper type thing as a gift for my family with:
- homemade jams & cordials
- a sewn gift (apron, baby things for my 7-month pregnant sister - baby shoes look very cute, other ideas appreciated!)
- homemade crackers and dip (my partner made some fabulous crackers the other day but now we are having trouble finding the recipe, don't you hate that!?) and maybe cheese if I can get all the stuff in time
- a seedling or plant of some sort
I'd love to hear if you make you gifts and what you create.
x
Kim
Friday, November 5, 2010
Chickens!
We have just received word from our real estate that the owners of house we are renting have okay'ed us having chickens!
So excited! Bring on fresh eggs, chicken pop and crazy chicken antics!
Now we need to think of a coop-type thing. I'm thinking a bird aviary with some adjustments.
What do you use?
So excited! Bring on fresh eggs, chicken pop and crazy chicken antics!
Now we need to think of a coop-type thing. I'm thinking a bird aviary with some adjustments.
What do you use?
Thursday, November 4, 2010
My first sewing project from a pattern!
The other night I was itching to do some sewing.
After mending some clothes that had rips and tears I decided to cut out the pieces for the Betsy handbag from the Burda Style website, which you can download for free.
Before I knew it I had whipped up this little baby. Ok so I didn't actually follow the instructions. I used the pattern to cut out the fabric but the instructions were still a bit jibberish to me so I just tried to apply common sense! Well it turnd out ok


The only things that didn't work out were:
Oh well! I was still pleased as punch to finish this little baby. I will now work actually understanding the instructions and try to follow that to make some christmas presents and maybe even one for a giveaway, stay tuned!
xx
Kim
After mending some clothes that had rips and tears I decided to cut out the pieces for the Betsy handbag from the Burda Style website, which you can download for free.
Before I knew it I had whipped up this little baby. Ok so I didn't actually follow the instructions. I used the pattern to cut out the fabric but the instructions were still a bit jibberish to me so I just tried to apply common sense! Well it turnd out ok


The only things that didn't work out were:
- I forgot about the straps and had to sew them on afterwards, still works just looks a little funky!
- You can see the seams on the inside. I'm pretty sure if you actually followed the instructions it shows a way where they can be hidden in the lining somehow
Oh well! I was still pleased as punch to finish this little baby. I will now work actually understanding the instructions and try to follow that to make some christmas presents and maybe even one for a giveaway, stay tuned!
xx
Kim
Wednesday, November 3, 2010
New spring life
Ah how beautiful is spring! Especially when you're not having to go to work everyday! hehe
Now that I have allowed myself a few months off from work I have plenty of time to explore my hobbies. I am loving potttering in the garden tending to my fruit and vegies, learning to sew and baking up a storm! HELLO HOMESTEADING!
You certainly don't need to be in the country to be living the dream.
Here are some new photos of the new little lives springing up in my garden this spring.
Luffa's springing into flower. Check out that fruit forming behind the flower! I have a special connection with my 4 luffa plants because I raised them all from seeds. One of the only seeds to have sprouted from that first bunch, so they are dearly treasured. I'm not sure how long they take to form their pods, but I'm hoping in time to add to some Christmas presents for the family.

Lovely lavender! Mmm can't wait to harvest those flowers. Anyone got any tips on harvesting and drying the flowers to use in scent bags?
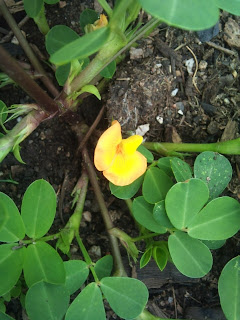
My peanut plant is flowering! I'm so intrigued by this little plant and how it grows those peanuts underground. Has anyone grown peanuts before? Any tips? Now I am growing fruit, veggies and nuts in my little suburban block!

Yummo strawberries. I think I need to plant a lot more of these becuase I pull off the fruit as soon as their ripe. How am I going to make jam at this rate!

Ah mint. Smells so lovely and is safely contained in a pot. Now I need to think of some recipes to use it in.....

Ah my one faithful lemon (top) finally has some friends, about 6 other lemons forming in fact!

Pumpkin vines, also raised from seed. I have quite a few of these vines int he ground so hoping for a big harvest in the coming months.
After getting excited and taking photos of all the plants happily growing away I headed off to buy some new additions.
I have since added:
I am disappointed with my seed raising results, as I know this is an area I'd really like to accomplish for both financial and satisfaction reasons. I started using the peat moss tabs but they seem to either dry out too quickly or get mossy! I'm now using seed raising mix, but I'm finding that with the amount of sand in it the water is not holding and they are drying out every few hours! Any tips are most welcome!
How is your garden growing this fine spring?
:)
Kim
Now that I have allowed myself a few months off from work I have plenty of time to explore my hobbies. I am loving potttering in the garden tending to my fruit and vegies, learning to sew and baking up a storm! HELLO HOMESTEADING!
You certainly don't need to be in the country to be living the dream.
Here are some new photos of the new little lives springing up in my garden this spring.
 |
Luffa's springing into flower. Check out that fruit forming behind the flower! I have a special connection with my 4 luffa plants because I raised them all from seeds. One of the only seeds to have sprouted from that first bunch, so they are dearly treasured. I'm not sure how long they take to form their pods, but I'm hoping in time to add to some Christmas presents for the family.

Lovely lavender! Mmm can't wait to harvest those flowers. Anyone got any tips on harvesting and drying the flowers to use in scent bags?

My peanut plant is flowering! I'm so intrigued by this little plant and how it grows those peanuts underground. Has anyone grown peanuts before? Any tips? Now I am growing fruit, veggies and nuts in my little suburban block!

Yummo strawberries. I think I need to plant a lot more of these becuase I pull off the fruit as soon as their ripe. How am I going to make jam at this rate!

Ah mint. Smells so lovely and is safely contained in a pot. Now I need to think of some recipes to use it in.....

Ah my one faithful lemon (top) finally has some friends, about 6 other lemons forming in fact!

Pumpkin vines, also raised from seed. I have quite a few of these vines int he ground so hoping for a big harvest in the coming months.
After getting excited and taking photos of all the plants happily growing away I headed off to buy some new additions.
I have since added:
- a grape vine (suited to QLD's humid weather luckily)
- a rosella bush seedling
- some garlic bulbs
- sweet potato seedling
- an heirloom mini capsicum bush seedling
- eggplant grown from seed
- chilli grown from seed
I am disappointed with my seed raising results, as I know this is an area I'd really like to accomplish for both financial and satisfaction reasons. I started using the peat moss tabs but they seem to either dry out too quickly or get mossy! I'm now using seed raising mix, but I'm finding that with the amount of sand in it the water is not holding and they are drying out every few hours! Any tips are most welcome!
How is your garden growing this fine spring?
:)
Kim
Subscribe to:
Posts (Atom)
